STEP 1
In your MATERIALS PALETTE
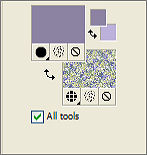
Load PURPLE ' #8c83a3 ' in your foreground
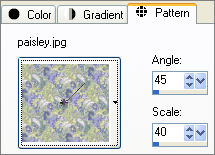
Load the ' paisley ' pattern in your background
using these settings.
.
|
 ..  |
STEP 2
Open a new image 640 x 480
Transparent background
PSP9: Colour Depth = 16 Million Colors (24bit)
PSPX-PSP2019: Colour Depth RGB = 8bits/channel
Choose your SELECTION TOOL then click on the CUSTOM SELECTION symbol, |
|
STEP 3
Flood fill with PURPLE
SELECTIONS >>> MODIFY >>> CONTRACT = 20
EDIT >>> CLEAR
DESELECT
With your MAGIC WAND
Mode = Replace
Match Mode = RGB Value
Tolerance = 0
Feather = 0
Antialias = UNchecked
Sample Merged = UNCHECKED
PSP9 - PSP2019: Check CONTIGUOUS
PSPX - PSP2019: There is no " Sample Merged"
PSP9 - PSP2019: Use all layers = UNChecked
Select the purple border, |
|
STEP 4
EFFECTS >>> 3D EFFECTS >>> INNER BEVEL, |
|
STEP 5
SELECTIONS >>> MODIFY >>> CONTRACT = 4
EFFECTS >>> 3D EFFECTS >>> INNER BEVEL
Same settings
EFFECTS >>> 3D EFFECTS >>> DROP SHADOW
Vertical & Horizontal offsets = 1
Colour = Black
Opacity = 60
Blur = 0
Repeat Drop Shadow effect changing
Vertical & Horizontal Offsets to - ( minus ) 1
Click OK
SELECTIONS >>> MODIFY >>> CONTRACT = 4
EFFECTS >>> 3D EFFECTS >>> INNER BEVEL
Change AMBIENCE = 20
EFFECTS >>> 3D EFFECTS >>> DROP SHADOW
Use the same settings
Click OK
Repeat Drop Shadow effect changing
Vertical & Horizontal Offsets to 1
Click OK
DESELECT
SAVE YOUR WORK
|
|
STEP 6
ADJUST >>> SHARPNESS >>> SHARPEN
Select your RASTER DEFORM tool
Mode = SCALE
use default settings
PSPX - PSP2019:Select your PICK tool
Move the centre top mode down to the 70 pixel mark
and the bottom centre node UP to the 410 pixel mark
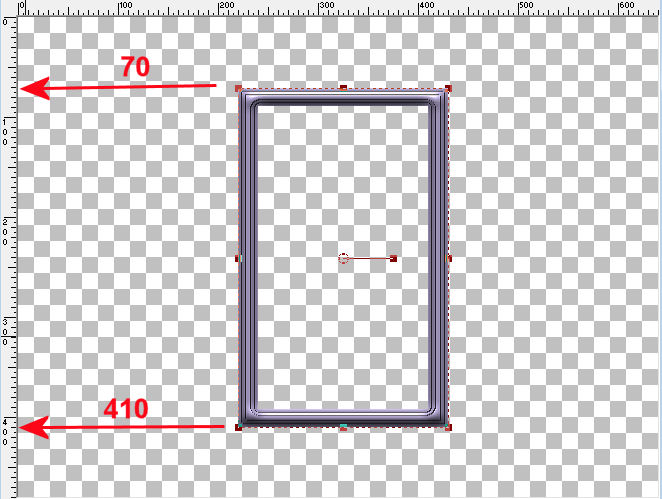
Click the RESET RECTANGLE arrow
Select the MOVER tool to disengage the DEFORMATION tool (PICK tool)
, |
STEP 7
Let's centre the frame...
Right click on the Title Bar and select COPY from the options
Right click on the Title Bar
and select PASTE AS NEW LAYER from the options.
(This centres the image)
ACTIVATE RASTER 1
EDIT >>>> CLEAR
ACTIVATE RASTER 2
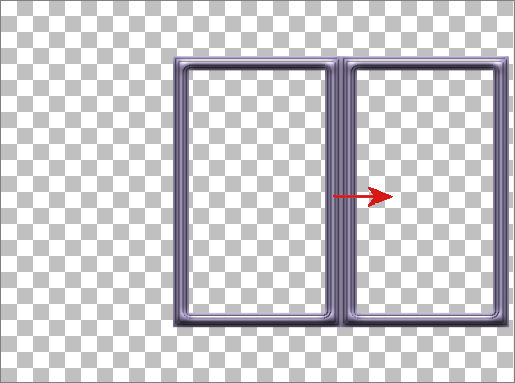
LAYERS >>> DUPLICATE
EFFECTS >>> IMAGE EFFECTS >>> OFFSET
Horizontal Offset = 210
Vertical Offset = 0
Edge Mode = Transparent,
 |
STEP 8
Select your DEFORMATION / PICK tool
Same settings
Move the RIGHT SIDE CENTRE NODE to the LEFT level with the 580 pixel mark, |
|
STEP 9
Depress your CTRL key and drag the TOP RIGHT NODE up to the 50 pixel mark
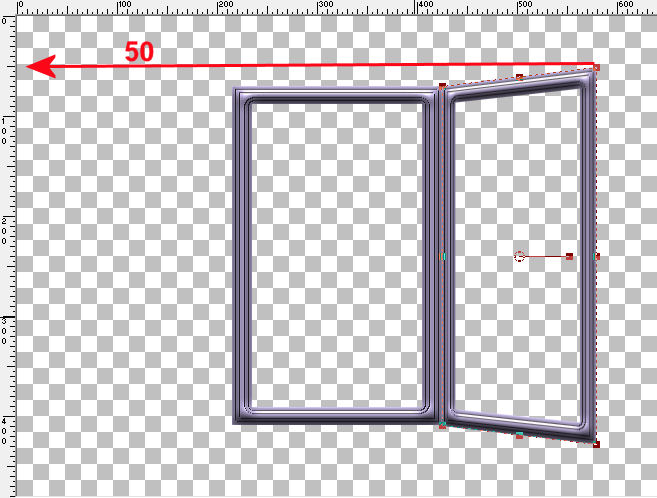
Click the RESET RECTANGLE arrow
ADJUST >>> SHARPNESS >>> SHARPEN
, |
STEP 10
LAYERS >>> DUPLICATE
IMAGE >>> MIRROR
ADJUST >>> SHARPNESS >>> SHARPEN
LAYERS >>> MERGE >>> MERGE VISIBLE
SAVE YOUR WORK |
|
STEP 11
With your MAGIC WAND
Same settings
Select the OUTER transparent area
LAYERS >>> NEW RASTER LAYER
LAYERS >>> ARRANGE >>> MOVE DOWN
SELECTIONS >>> MODIFY >>> EXPAND = 4
(The outer 'marching ants' won't show)
Flood fill with PAISLEY pattern
ADJUST >>> SHARPNESS >>> SHARPEN
DESELECT
|
|
STEP 12
SELECTIONS >>> SELECT ALL
SELECTIONS >>> MODIFY >>> CONTRACT = 30
SELECTIONS >>> INVERT
EDIT >>> CLEAR
DESELECT
EFFECTS >>> 3D EFFECTS >>> DROP SHADOW
Use the same settings
Click OK
Repeat Drop Shadow effect changing
Vertical & Horizontal Offsets to 1
Click OK
EFFECTS >>> 3D EFFECTS >>> INNER BEVEL,
SAVE YOUR WORK
|
|
STEP 13
LAYERS >>> NEW RASTER LAYER
LAYERS >>> ARRANGE >>> BRING TO TOP
SELECTIONS >>> SELECT ALL
SELECTIONS >>> MODIFY >>> CONTRACT = 30
SELECTIONS >>> INVERT
Flood fill with SOLID PURPLE
EFFECTS >>> 3D EFFECTS >>> INNER BEVEL
, |
|
STEP 14
EFFECTS >>> 3D EFFECTS >>> DROP SHADOW
Use the same settings
Click OK
Repeat Drop Shadow effect changing
Vertical & Horizontal Offsets to 1
Click OK
SELECTIONS >>> MODIFY >>> CONTRACT = 6
EFFECTS >>> 3D EFFECTS >>> INNER BEVEL
Same settings
EFFECTS >>> 3D EFFECTS >>> DROP SHADOW
Use the same settings
Click OK
Repeat Drop Shadow effect changing
Vertical & Horizontal Offsets to 1
Click OK
DO NOT DESELECT
|
|
STEP 15
SELECTIONS >>> MODIFY >>> CONTRACT = 6
EFFECTS >>> 3D EFFECTS >>> INNER BEVEL
Change AMBIENCE = 25
EFFECTS >>> 3D EFFECTS >>> DROP SHADOW
Use the same settings
Click OK
Repeat Drop Shadow effect changing
Vertical & Horizontal Offsets to 1
Click OK
DESELECT,
SAVE YOUR WORK
|
|
STEP 16
LAYERS >>> DUPLICATE (TWICE)
ACTIVATE RASTER 2
LAYERS >>> ARRANGE >>> MOVE DOWN
EFFECTS>>> GEOMETRIC EFFECTS >>> CIRCLE
Edge Mode = Transparent
|
|
STEP 17
ACTIVATE Copy of Raster 2
LAYERS >>> ARRANGE >>> MOVE DOWN
EFFECTS>>> GEOMETRIC EFFECTS >>> SKEW |
|
STEP 18
LAYERS >>> DUPLICATE
PSP9 - PSPX3: IMAGE >>> MIRROR
PSPX4 - PSPX8: Use script available for download at top of page.
(Higher versions follow your version's method)
SAVE YOUR WORK
|
|
STEP 19
ACTIVATE the MERGED layer
With your MAGIC WAND
Same settings and using your SHIFT KEY
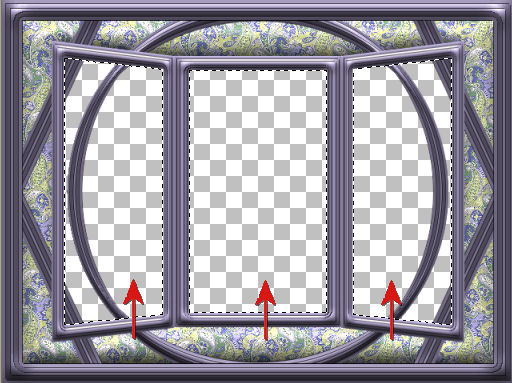
Select the centre of all 3 frames ,
|
STEP 20
Close layers indicated and ACTIVATE Raster 2 |
|
STEP 21
LAYERS >>> MERGE >>> MERGE VISIBLE
EDIT >>> CLEAR
DESELECT
OPEN ALL LAYERS
EFFECTS >>> 3D EFFECTS >>> INNER BEVEL, |
|
STEP 22
EFFECTS >>> 3D EFFECTS >>> DROP SHADOW
Vertical & Horizontal offsets = 5
Colour = Black
Opacity = 60
Blur = 10.00
Repeat Drop Shadow effect changing
Vertical & Horizontal Offsets to - ( minus ) 5
Click OK
ACTIVATE the UPPER Merged layer
With your MAGIC WAND
Same settings and using your SHIFT KEY
Select the transparent centre of all 3 frames , |
|
STEP 23
ACTIVATE THE LOWER MERGED LAYER
EDIT >>> CLEAR
DO NOT DESELECT
LAYERS >>> MERGE >>> MERGE VISIBLE
LAYERS >>> NEW RASTER LAYER
LAYERS >>> ARRANGE >>> MOVE DOWN
SELECTIONS >>> MODIFY >>> EXPAND = 3
SELECTIONS >>> INVERT
Repeat both Drop Shadows
DESELECT |
|
STEP 24
LAYERS >>> MERGE >>> MERGE VISIBLE
Save as .pspimage image
, |
STEP 25
Open up the " alex.jpg " image in your PSP workspace
Right click on the Title Bar and select COPY from the options
With your MAGIC WAND
Same settings and using your SHIFT KEY to pick up the shadow
Select the transparent centre of the right hand frame
SELECTIONS >>> MODIFY >>> EXPAND = 5
LAYERS >>> NEW RASTER LAYER
LAYERS >>> ARRANGE >>> SEND TO BOTTOM
Right click on the Title Bar
and select PASTE INTO SELECTION from the options.
DESELECT |
|
STEP 26
Open up the " pb93817.jpg " image in your PSP workspace
Right click on the Title Bar and select COPY from the options
On your frame image ACTIVATE the MERGED LAYER
With your MAGIC WAND
Same settings and using your SHIFT KEY to pick up the shadow
Select the transparent centre of the CENTRE frame
SELECTIONS >>> MODIFY >>> EXPAND = 5
ACTIVATE RASTER 1
Right click on the Title Bar
and select PASTE INTO SELECTION from the options.
DESELECT |
|
STEP 27
Open up the " pinkbow-big.jpg " image in your PSP workspace
Right click on the Title Bar and select COPY from the options
On your frame image ACTIVATE the MERGED LAYER
With your MAGIC WAND
Same settings and using your SHIFT KEY to pick up the shadow
Select the transparent centre of the LEFT frame
SELECTIONS >>> MODIFY >>> EXPAND = 5
ACTIVATE RASTER 1
Right click on the Title Bar
and select PASTE INTO SELECTION from the options.
DESELECT
SAVE YOUR WORK
|
|
STEP 28
LAYERS >>> MERGE >>> MERGE ALL (Flatten),
LAYERS >>> NEW RASTER LAYER
SELECT your TEXT tool
With a font of your choice add your name
LAYERS >>> MERGE >>> MERGE ALL (Flatten)
Save as .jpg image
|
| |
|
| |
|