TAG BACK 7
PSP8/9/X
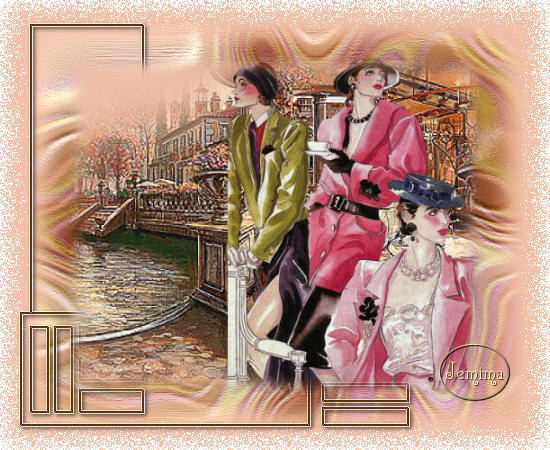
This tutorial was
written by Jemima ~ January 2007
Copyright © 2007 ~ Jemima
~ All rights reserved
********************************
This was created using PSP9 but can be adapted for other versions of PSP.
You will need the
following to complete this tutorial
Materials
LEFT CLICK >>> SAVE
la_terrasse.psp
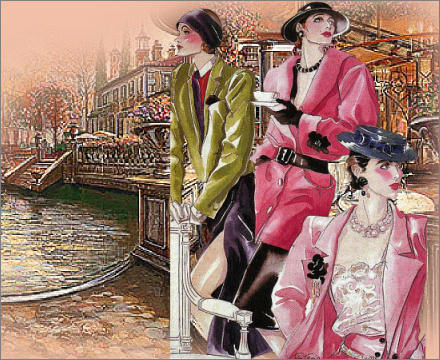
woman22_cat.psp
JF39shapeB.psp
Save to a folder on your computer
Plugins
** EYE CANDY3 **
http://www.pircnet.com/downloads.html
OR
http://www.fleursauvage.be/utilitaire/filtres/filtres.htm
********************************
Open all your images in PSP and minimize.
Open a new image 550 x 450
Transparent background
PSPX: Colour Depth = 8bits/channel
Flood fill with " #f2c0a7 "
SELECTIONS >>> SELECT ALL
LAYERS >>> NEW RASTER LAYER
Open up the la_terrasse.psp image in your PSP workspace
ACTIVATE LAYER 1
Choose your SELECTION TOOL then click on the CUSTOM SELECTION
symbol
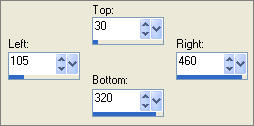
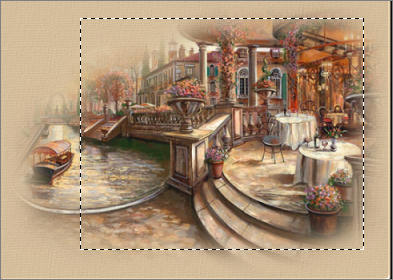
Right click on the Title Bar and select COPY from the options
Right click on the Title Bar of your tag image
and select PASTE INTO SELECTION from the options.
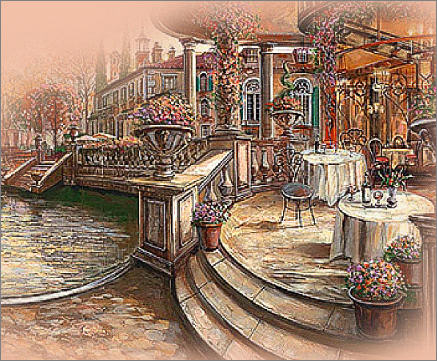
EFFECTS >>> EDGE EFFECTS >>> ENHANCE
REPEAT Enhance Edges
DESELECT
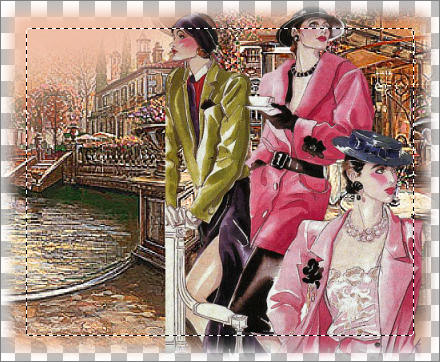
Open up the woman22_cat.psp image in your PSP workspace
Right click on the Title Bar and select COPY from the options
Right click on the Title Bar of your tag image
and select PASTE AS NEW LAYER from the options.
IMAGE >>> RESIZE = 60%
Ensure "Resize all layers" is UNCHECKED
Reposition with your MOVER tool
LAYERS >>> MERGE >>> MERGE VISIBLE
SELECTIONS >>> SELECT ALL
SELECTIONS >>> MODIFY >>> CONTRACT = 15
SELECTIONS >>> MODIFY >>> FEATHER = 20
SELECTIONS >>> INVERT
EDIT >>> CLEAR
DESELECT
LAYERS >>> DUPLICATE
CLOSE the MERGED layer
IMAGE >>> RESIZE = 85%
Ensure "Resize all layers" is UNCHECKED
OPEN & ACTIVATE THE MERGED LAYER
SELECTIONS >>> SELECT ALL
SELECTIONS >>> MODIFY >>> CONTRACT = 70
SELECTIONS >>> INVERT
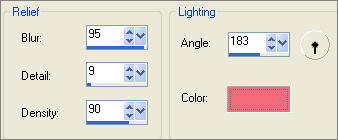
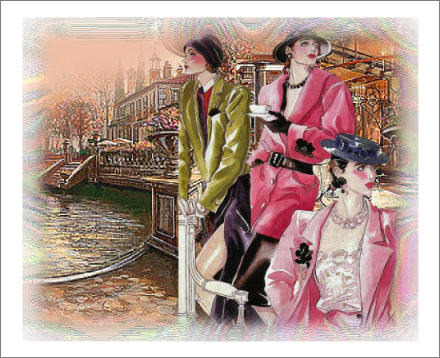
EFFECTS >>> TEXTURE EFFECTS >>> SOFT PLASTIC
COLOUR = " #f46b7b "
DESELECT
LAYERS >>> NEW RASTER LAYER
LAYERS >>> ARRANGE >>> SEND TO BOTTOM
Flood fill with WHITE
ACTIVATE the MERGED layer
IMAGE >>> RESIZE = 90%
Ensure "Resize all layers" is UNCHECKED
ACTIVATE the "Copy of Merged" layer
IMAGE >>> RESIZE = 90%
Ensure "Resize all layers" is UNCHECKED

ACTIVATE THE MERGED LAYER
LAYERS >>> DUPLICATE
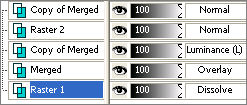
In your LAYER PALETTE change the BLEND MODE to LUMINANCE (L)
ON THE MERGED LAYER
In your LAYER PALETTE change the BLEND MODE to OVERLAY
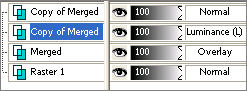
ACTIVATE RASTER 1
Flood fill with " #f2c0a7 "
ACTIVATE THE MERGED LAYER
With your MAGIC WAND
Mode = Replace
Match Mode = RGB Value
Tolerance = 0
Feather = 0
Antialias = Checked
Sample Merged = UNCHECKED
PSP9/X: Check CONTIGUOUS
PSPX: There is no " Sample Merged"
PSPX: Use all layers = UNChecked
PSP9/X: ANTIALIAS = Inside
Select the area around the image

SELECTIONS >>> INVERT
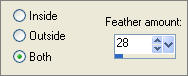
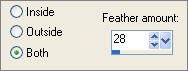
SELECTIONS >>> MODIFY >>> INSIDE/OUTSIDE FEATHER
SELECTIONS >>> INVERT
EDIT >>> CLEAR
Repeat... EDIT >>>Repeat CLEAR (twice)
(You won't see any change until you do the next step)
ACTIVATE the first "Copy of Merged" layer
EDIT >>> CLEAR
Repeat... EDIT >>> Repeat CLEAR (twice)
DESELECT

Open up the JF39shapeB.psp image in your PSP workspace
Right click on the Title Bar and select COPY from the options
Right click on the Title Bar of your tag image
and select PASTE AS NEW LAYER from the options.
Reposition with your MOVER tool by dragging the bottom left corner to the left

Choose your SELECTION TOOL
Selection Type = Rectangle
Mode = Replace
Feather = 0
Antialias = Checked
Draw a rectangle as shown below
Click inside the marching ants to select the shape

Select your AIRBRUSH tool
Select the "+Round 50 " brush

Fill with " #7b6e2d "
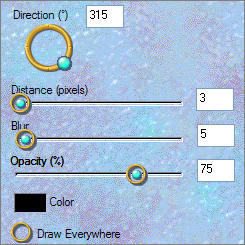
EFFECTS >>> 3D EFFECTS >>> DROP SHADOW
Vertical & Horizontal offsets = 1
Colour = WHITE
Opacity = 60
Blur = 0
Repeat Drop Shadow effect changing
Vertical & Horizontal Offsets to - ( minus ) 1
Click OK
EFFECTS >>> PLUGINS >>> EYE CANDY 3 >>> DROP SHADOW
DESELECT
ADJUST >>> SHARPNESS >>> SHARPEN
ACTIVATE RASTER 1
SELECTIONS >>> SELECT ALL
SELECTIONS >>> MODIFY >>> INSIDE/OUTSIDE FEATHER
SELECTIONS >>> INVERT
EDIT >>> CLEAR
EDIT >>> Repeat EDIT >>> CLEAR
Change the BLEND MODE to DISSOLVE
DESELECT
LAYERS >>> MERGE >>> MERGE VISIBLE
LAYERS >>> NEW RASTER LAYER
LAYERS >>> ARRANGE >>> MOVE DOWN
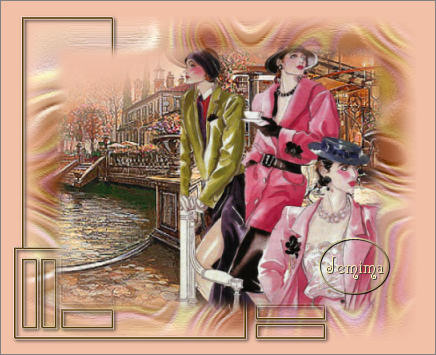
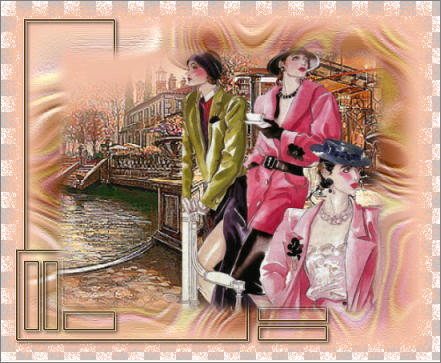
This is your background layer... colour it to match your web page or stationery.
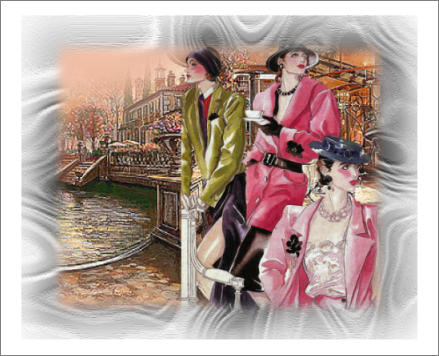
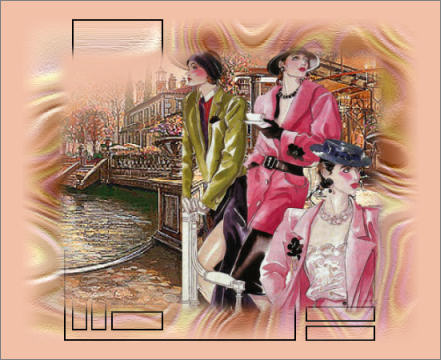
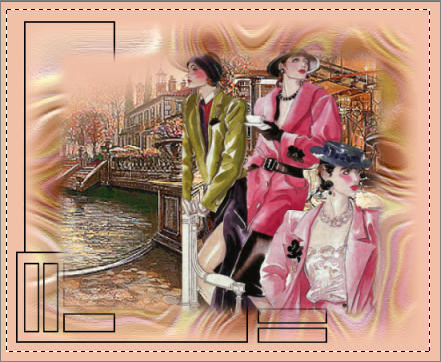
Save as .psp image
Once you complete the background...
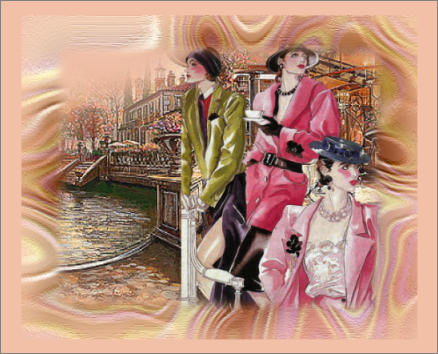
LAYERS >>> MERGE >>> MERGE ALL (Flatten)
Save as .jpg image
TESTERS RESULTS
Page designed by

for

http://www.artistrypsp.com/
Copyright ©
2000-2007 Artistry In PSP / PSP Artistry
All rights reserved.
Unless specifically made available for
download,
no graphics or text may be removed from
this site for any reason
without written permission from Artistry
In PSP / PSP Artistry
|