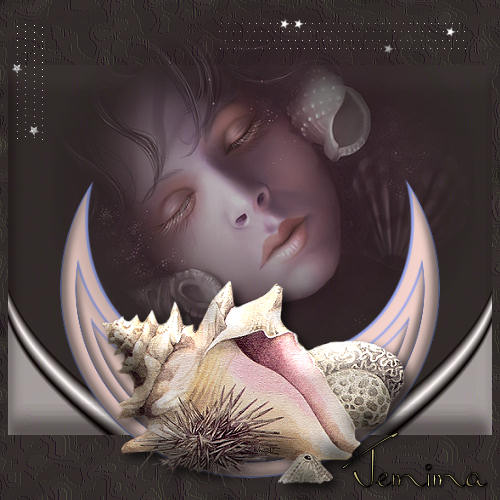
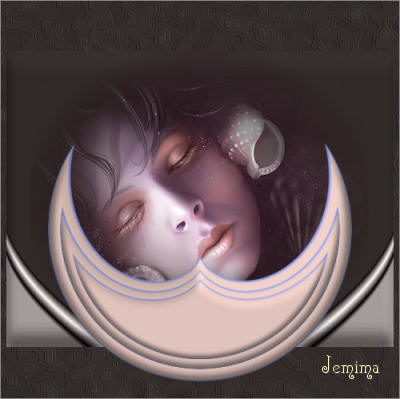
REPOSE
PSP8/9/X
This tutorial was
written by Jemima ~ January 2007
Copyright © 2007 ~ Jemima
~ All rights reserved
********************************
This was created using PSP9 but can be adapted for other versions of PSP.
You will need the
following to complete this tutorial
Materials
LEFT CLICK >>> SAVE
Tubed by Monique42_1825_misted.psp
MB_SHELLS_KKAT47.psp
accents_Dani05.psp
Save to a folder on your computer
Plugins
NONE
********************************
Open a new image 500 x 500
Transparent background
PSPX: Colour Depth = 8bits/channel
In your MATERIALS PALETTE load
SOLID BLUE " #8f9cdf " in the foreground and
SOLID PINK " #e1c4be" in the background
Select your PRESET SHAPES tool
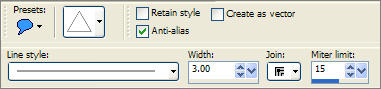
If you don't have your RULER showing
VIEW >>> RULERS
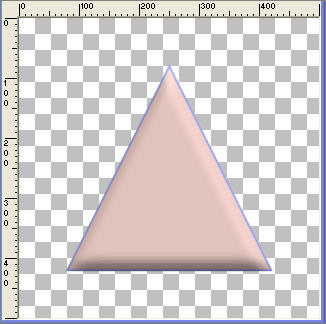
Starting at position 80 across, 80 down draw a triangle
finishing ar 420 across and 420 down.
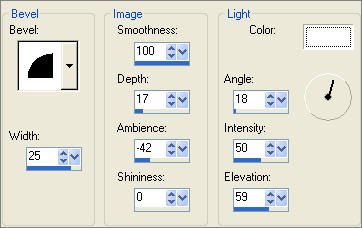
EFFECTS >>> 3D EFFECTS >>> INNER BEVEL
LAYERS >>> DUPLICATE
IMAGE >>> RESIZE = 80%
Ensure "Resize all layers" is UNCHECKED
LAYERS >>> DUPLICATE
IMAGE >>> RESIZE = 80%
Ensure "Resize all layers" is UNCHECKED
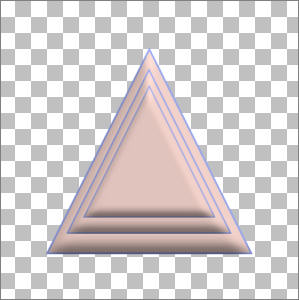
LAYERS >>> MERGE >>> MERGE VISIBLE
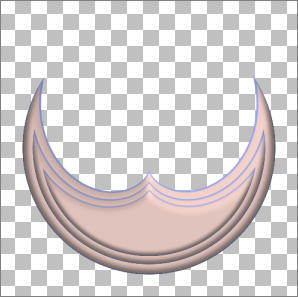
EFFECTS >>> DISTORTION EFFECTS >>> POLAR COORDINATES
 . .
Open up the " Tubed by Monique42_1825_misted.psp " image in your PSP workspace
Activate the " Laag 2 " layer (the black background)
Right click on the Title Bar and select COPY from the options
Right click on the Title Bar of your TAG image
and select PASTE AS NEW LAYER from the options.
LAYERS >>> ARRANGE >>> MOVE DOWN
Go back to the " Tubed by Monique42_1825_misted.psp " image
Activate the " Laag 1 " layer
Right click on the Title Bar and select COPY from the options
Right click on the Title Bar of your TAG image
and select PASTE AS NEW LAYER from the options.
Activate the Merged layer (the polar shape)
IMAGE >>> RESIZE = 90%
Ensure "Resize all layers" is UNCHECKED
Activate Raster 1
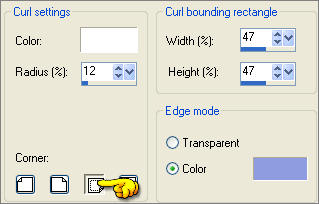
EFFECTS >>> IMAGE EFFECTS >>> PAGE CURL
COLOUR = "
#8f9cdf "
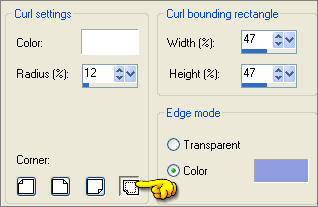 . . 
REPEAT PAGE CURL
 . . 
EFFECTS >>> 3D EFFECTS >>> INNER BEVEL
Same settings
EFFECTS>>> GEOMETRIC EFFECTS >>> CYLINDER - VERTICAL
 . . 
LAYERS >>> NEW RASTER LAYER
LAYERS >>> ARRANGE >>> MOVE DOWN
Flood fill with SOLID PINK " #e1c4be"
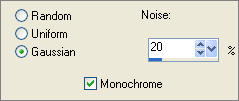
ADJUST >>> ADD/REMOVE NOISE >>> ADD NOISE
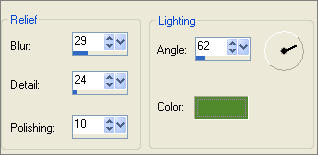
EFFECTS >>> TEXTURE EFFECTS >>> POLISHED STONE
COLOUR = "
#508a2c "
ADJUST >>> SHARPNESS >>> SHARPEN MORE
CHANGE THE BLEND MODE on Raster 1 to "Luminance (Legacy)
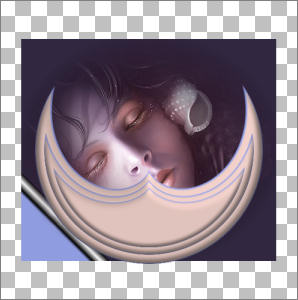
With your MOVER TOOL drag the SHAPE
(Merged layer) down so it rests on the curves
created by the 'page curl'.
Reduce the OPACITY on Raster 2 to 66%
Make sure the MERGED layer is still active
Open the " MB_SHELLS_KKAT47.psp" image
Right click on the Title Bar and select COPY from the options
Right click on the Title Bar of your tag image
and select PASTE AS NEW LAYER from the options.
IMAGE >>> RESIZE = 85%
Ensure "Resize all layers" is UNCHECKED
EFFECTS >>> 3D EFFECTS >>> INNER BEVEL
Same settings
EDIT >>> Repeat Inner Bevel
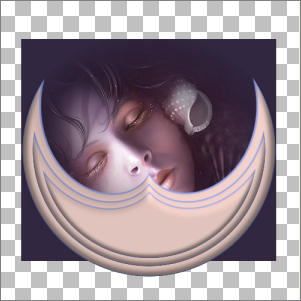
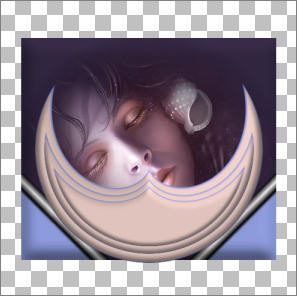
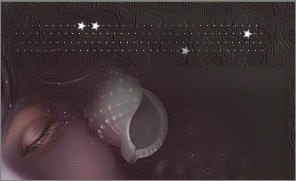
With your MOVER TOOL reposition as shown below.
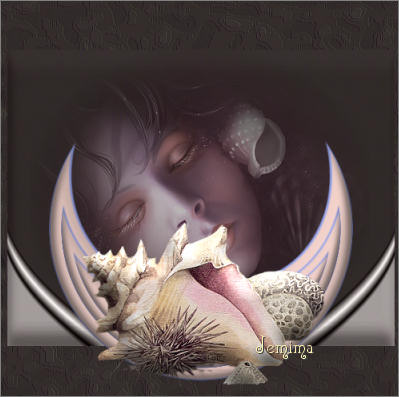
Activate Raster 2 and reposition the 'face' with your MOVER TOOL
Activate Raster 4 (The shells)
EFFECTS >>> 3D EFFECTS >>> DROP SHADOW
LAYERS >>> MERGE >>> MERGE VISIBLE
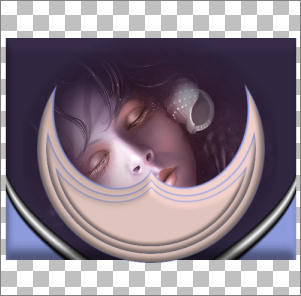
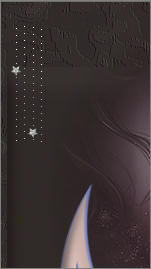
Open the " accents_Dani05.psp " image in your PSP workspace.
Activate the "
Ebene3 " layer
Right click on the Title Bar and select COPY from the options
Right click on the Title Bar of your tag image
and select PASTE AS NEW LAYER from the options.
Reposition using your MOVER TOOL, to the top right of your tag
ADJUST >>> HUE & SATURATION >>> COLORIZE
HUE = 0
SATURATION = 0
Go back to the " accents_Dani05.psp " image in your PSP workspace.
Activate the " Ebene2 " layer
Right click on the Title Bar and select COPY from the options
Right click on the Title Bar of your tag image
and select PASTE AS NEW LAYER from the options.
Reposition using your MOVER TOOL, to the top left corner of your tag
ADJUST >>> HUE & SATURATION >>> COLORIZE
HUE = 0
SATURATION = 0
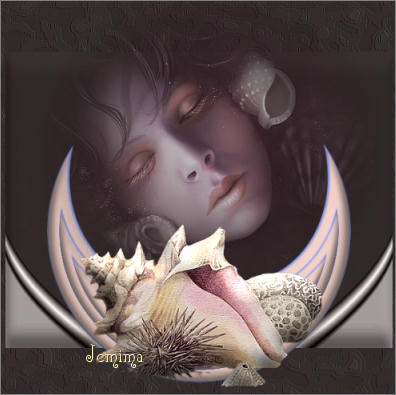
LAYERS >>> MERGE >>> MERGE ALL (Flatten)
Save as .jpg image
TESTERS RESULTS
Page designed by

http://www.artistrypsp.com/
Copyright ©
2000-2007 Artistry In PSP / PSP Artistry
All rights reserved.
Unless specifically made available for
download,
no graphics or text may be removed from
this site for any reason
without written permission from Artistry
In PSP / PSP Artistry
TUTORIAL INDEX |
