Valentine 2
PSP8/9

This tutorial was
written by Jemima ~ January 2007
Copyright © 2007 ~ Jemima
~ All rights reserved
********************************
You will need the
following to complete this tutorial
Materials
" Lovedrops.ttf " Font
Click link... then....
Right click and Save in your WINDOWS/Fonts folder
" goldfill1 "pattern
"Line art pink" pattern (pspimage)
Click link... then....
Right click and Save Image As to your PSP Patterns folder
Plugin
** EYE CANDY3 **
http://www.pircnet.com/downloads.html
********************************
SAVE OFTEN .. you never know when PSP will 'hiccup'!
On your MATERIALS PALETTE
Load solid RED ( #E71D1D ) into your background
and
" goldfill1 "pattern into your foreground

If you keep your Fonts in a folder other than the "Windows>>Fonts" folder
Locate the Lovedrops.ttf font .. double click on it to open an 'view' the font,
minimise the view to your task bar.
Open a new image 500 x 500
Transparent background
Select your TEXT tool

Type in the letter " v " ( lower case - vee)
DESELECT
IMAGE >>> ROTATE >>> FREE ROTATE = Right 22.50
Ensure "All layers" is UNCHECKED

With your MOVER tool reposition the heart to the top right as shown below
about 20 pixels from the top and 20 pixels in from the right.

LAYERS >>> DUPLICATE
IMAGE >>> FLIP
LAYERS >>> DUPLICATE
IMAGE >>> MIRROR
LAYERS >>> DUPLICATE
IMAGE >>> FLIP

LAYERS >>> MERGE >>> MERGE VISIBLE
ADJUST >>> SHARPNESS >>> UNSHARP MASK
With your MAGIC WAND
Mode = Replace
Match Mode = RGB Value
Tolerance =50
Feather = 0
Antialias = UNchecked
Sample Merged = UNCHECKED
PSP9 USERS: CHECK CONTIGUOUS
Holding down your SHIFT key, select all the red areas.
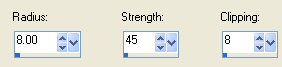
EFFECTS >>> 3D EFFECTS >>> INNER BEVEL
COLOUR = (
#E71D1D )

DESELECT
LAYERS >>> DUPLICATE
IMAGE >>> RESIZE = 75%
Ensure "Resize all layers" is UNCHECKED
IMAGE >>> ROTATE >>> FREE ROTATE = Right 22.50
Ensure "All layers" is UNCHECKED

LAYERS >>> DUPLICATE
IMAGE >>> ROTATE >>> FREE ROTATE = Right 22.50
Ensure "All layers" is UNCHECKED

LAYERS >>> MERGE >>> MERGE VISIBLE
Choose your SELECTION TOOL
Selection Type = CIRCLE
Mode = Replace
Feather = 0
Antialias = Checked
Starting at position 250, 250 draw a circle by dragging you mouse (cursor)
to position 380, 380 which shows in your task bar .

EDIT >>> CLEAR
Floodfill with 'goldfill1' pattern
SELECTIONS >>> MODIFY >>> CONTRACT = 3
EDIT >>> CLEAR
Floodfill with RED
SELECTIONS >>> MODIFY >>> CONTRACT = 6
EDIT >>> CLEAR
Floodfill with 'goldfill1' pattern
SELECTIONS >>> MODIFY >>> CONTRACT = 3
EDIT >>> CLEAR
SELECTIONS >>> MODIFY >>> EXPAND = 3
SELECTIONS >>> INVERT
LAYERS >>> NEW RASTER LAYER
LAYERS >>> ARRANGE >>> MOVE DOWN
EFFECTS >>> PLUGINS >>> EYE CANDY 3 >>> DROP SHADOW


DESELECT
Activate the MERGED layer
With your MAGIC WAND, same settings select the OUTER transparent area
SELECTIONS >>> INVERT
SELECTIONS >>> MODIFY >>> CONTRACT = 6
LAYERS >>> NEW RASTER LAYER
LAYERS >>> ARRANGE >>> MOVE DOWN
SELECTIONS >>> INVERT
Floodfill with RED
EFFECTS >>> TEXTURE EFFECTS >>> SCULPTURE
COLOUR = ( #E71D1D )
PATTERN = line art pink

EFFECTS >>> EDGE EFFECTS >>> ENHANCE MORE
EFFECTS >>> 3D EFFECTS >>> INNER BEVEL
Same settings.
ADJUST >>> SHARPNESS >>> SHARPEN MORE
DO NOT DESELECT
LAYERS >>> MERGE >>> MERGE VISIBLE
LAYERS >>> NEW RASTER LAYER
SELECTIONS >>> MODIFY >>> CONTRACT = 16
Flood fill selected areas with GOLD

SELECTIONS >>> MODIFY >>> CONTRACT = 3
EDIT >>> CLEAR
EFFECTS >>> 3D Effects >>> Drop Shadow
Vertical & Horizontal offsets = 1
Colour = Black
Opacity = 55
Blur = 2.00
Repeat Drop Shadow effect changing
Vertical & Horizontal Offsets to - ( minus ) 1
Click OK
Activate the MERGED layer
EFFECTS >>> 3D EFFECTS >>> INNER BEVEL
Same settings.
DESELECT
LAYERS >>> MERGE >>> MERGE VISIBLE
LAYERS >>> NEW RASTER LAYER
SELECTIONS >>> SELECT ALL
SELECTIONS >>> MODIFY >>> CONTRACT = 3
SELECTIONS >>> INVERT
Flood fill with GOLD
EFFECTS >>> 3D Effects >>> Drop Shadow
Vertical & Horizontal offsets = 1
Colour = Black
Opacity = 55
Blur = 0
Repeat Drop Shadow effect changing
Vertical & Horizontal Offsets to - ( minus ) 1
Click OK
DESELECT
LAYERS >>> MERGE >>> MERGE VISIBLE
And you're done!!!
SAVE AS A .PSP IMAGE
The frame is ready for an image of your choice, and your own embellishments *S*
Just add a new layer and move it under the frame, then copy and paste your image.
Once you have your final result I suggest you save it as a .GIF image
as opposed to a .JPG image which leaves nasty marks on the red areas of the frame.
The .GIF image is so much clearer.
Page designed by

for

http://www.artistrypsp.com/
Copyright ©
2000-2007 Artistry In PSP / PSP Artistry
All rights reserved.
Unless specifically made available for
download,
no graphics or text may be removed from
this site for any reason
without written permission from Artistry
In PSP / PSP Artistry
|