Valentine 1 - 2007
PSP8/9

This tutorial was
written by Jemima ~ September 2006
Copyright © 2006/7 ~ Jemima
~ All rights reserved
********************************
You will need the
following to complete this tutorial
Materials
PATTERN: PatternB~08_GxChic!.bmp
Click link... then....
Right click and Save Image As to your PSP Patterns folder
PRESET SHAPE: DH_Heart1a.jsl
Click link... then....
Right click and Save Image As to your PSP Shapes folder
TEXTURE: hearts_n_hearts.jpg
Click link... then....
Right click and Save Image As to your PSP Textures folder
TUBES
DaisyWeb_RomanticEvening.psp
floralhearts01-sandi.psp
Click link... then....
Right click and Save Image As to a folder on your computer
** EYE CANDY3 **
http://www.pircnet.com/downloads.html
********************************
SAVE OFTEN .. you never know when PSP will 'hiccup'!
On your MATERIALS PALETTE
Load SOLID PINK (
#FFD1EE ) in your background
Load "goldfill1" PATTERN in your foreground
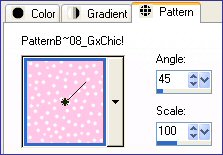
Load "PatternB~08_GxChic!" PATTERN in your background
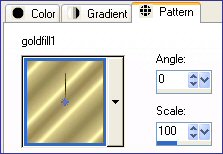 ... ... 
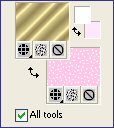
Change your background to SOLID PINK
Open a new image 350 x 450 ....
Transparent background
LAYERS >>> NEW RASTER LAYER
Select your PRESET SHAPES tool ... locate the 'heart 1' shape
and use these settings
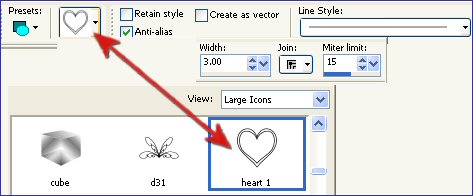
Starting at position 40 across, 70 down drag the cursor down and right
to position 310 across, 400 down.
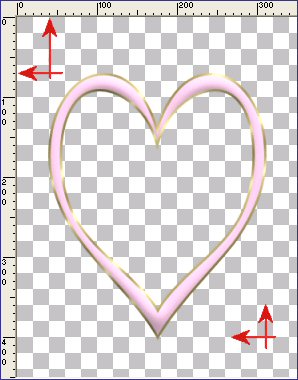
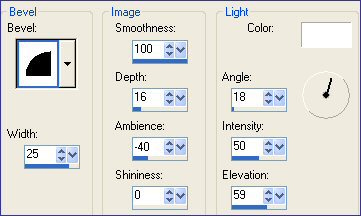
EFFECTS >>> 3D EFFECTS >>> INNER BEVEL
Change your background to "PatternB~08_GxChic!"
With your MAGIC WAND
Mode = Replace
Match Mode = RGB Value
Tolerance = 0
Feather = 0
Antialias = Checked (Inside)
Sample Merged = UNCHECKED
PSP9 USERS: CHECK CONTIGUOUS
Select the OUTER transparent area
LAYERS >>> NEW RASTER LAYER
LAYERS >>> ARRANGE >>> MOVE DOWN
Flood fill with the Pink pattern
SELECTIONS >>> INVERT
SELECTIONS >>> MODIFY >>> EXPAND = 12
SELECTIONS >>> INVERT
EDIT >>> CLEAR
DESELECT
EFFECTS >>> 3D EFFECTS >>> INNER BEVEL
Same settings
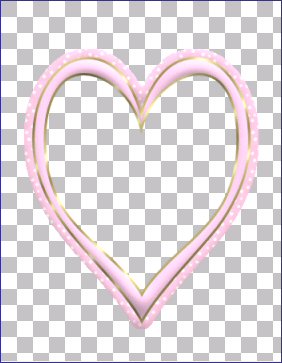
With your MAGIC WAND ... Select the OUTER transparent area
LAYERS >>> NEW RASTER LAYER
LAYERS >>> ARRANGE >>> MOVE DOWN
SELECTIONS >>> INVERT
Flood fill with GOLD
SELECTIONS >>> INVERT
SELECTIONS >>> MODIFY >>> EXPAND = 3
SELECTIONS >>> INVERT
EDIT >>> CLEAR
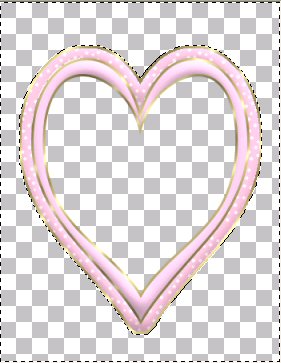
CLOSE Raster 1
LAYERS >>> MERGE >>> MERGE VISIBLE
LAYERS >>> NEW RASTER LAYER
LAYERS >>> ARRANGE >>> MOVE DOWN
SELECTIONS >>> INVERT
Flood fill with SOLID PINK
EFFECTS >>> TEXTURE EFFECTS >>> SCULPTURE
Locate the "hearts_n_hearts" pattern
COLOUR = (
#FFD1EE )
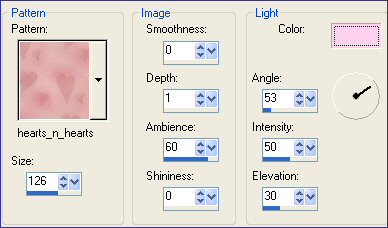
EFFECTS >>> REFLECTION EFFECTS >>> ROTATING MIRROR
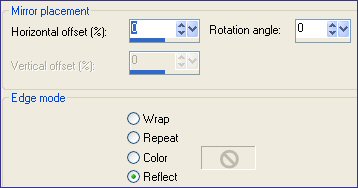
SELECTIONS >>> MODIFY >>> CONTRACT = 25
EFFECTS >>> 3D EFFECTS >>> INNER BEVEL
Same settings
SELECTIONS >>> INVERT
EDIT >>> CLEAR
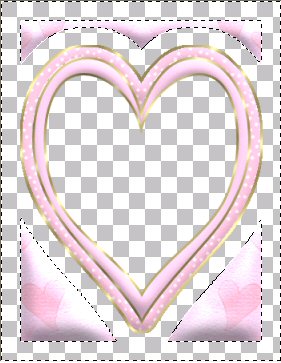
LAYERS >>> NEW RASTER LAYER
LAYERS >>> ARRANGE >>> MOVE DOWN
Flood fill with GOLD
SELECTIONS >>> INVERT
SELECTIONS >>> MODIFY >>> EXPAND = 2
SELECTIONS >>> INVERT
EDIT >>> CLEAR
DESELECT
Close the MERGED layer
LAYERS >>> MERGE >>> MERGE VISIBLE
Rename this layer "Merged 2"
With your MAGIC WAND ... Select the OUTER transparent area
LAYERS >>> NEW RASTER LAYER
LAYERS >>> ARRANGE >>> MOVE DOWN
Flood fill with SOLID PINK
DESELECT
Activate the MERGED layer
With your MAGIC WAND ... Select the CENTRE of the heart
Activate Raster 2
EDIT >>> CLEAR
Activate the MERGED 2 layer
With your MAGIC WAND ... Select the transparent section outside the heart
which looks PINK because Raster 2 is visible
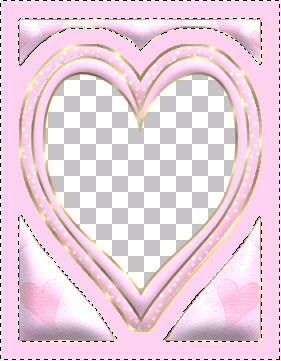
Activate Raster 2
EFFECTS >>> 3D EFFECTS >>> INNER BEVEL
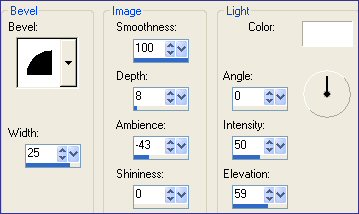
DESELECT
Highlight the " MERGED 2" layer.
With your SELECTION TOOL set to RECTANGLE
Mode = Replace
Feather = 0
Antialias = Checked
PSP9: Antialias = Inside
Draw a rectangle as show below
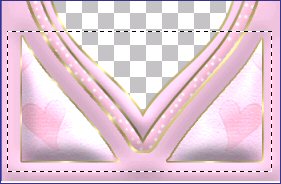
Click inside the rectangle to select the 2 triangular areas
EFFECTS >>> PLUGINS >>> EYE CANDY 3 >>> DROP SHADOW

DESELECT
LAYERS >>> MERGE >>> MERGE VISIBLE
SELECTIONS >>> SELECT ALL
SELECTIONS >>> MODIFY >>> CONTRACT = 3
SELECTIONS >>> INVERT
Flood fill with GOLD
EFFECTS >>> 3D Effects >>> Drop Shadow
Vertical & Horizontal offsets = 1
Colour = Black
Opacity = 100
Blur = 0
Repeat Drop Shadow effect changing
Vertical & Horizontal Offsets to - ( minus ) 1
Click OK
DESELECT

LAYERS >>> NEW RASTER LAYER
Open the "floralhearts01-sandi" tube and activate the PINK layer
Right click on the Title Bar and select COPY from the options
Go to your frame image ...
Right click on the Title Bar
and select PASTE AS NEW SELECTION from the options.
Reposition at bottom of your frame

ADJUST >>> BRIGHTNESS and CONTRAST >>> BRIGHTNESS/CONTRAST

ADJUST >>> SHARPNESS >>> SHARPEN
EFFECTS >>> PLUGINS >>> EYE CANDY 3 >>> DROP SHADOW
Same settings
DESELECT
With your SELECTION TOOL (Same settings)
Select the stems overlapping the gold border
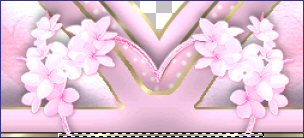
EDIT >>> CLEAR
DESELECT
LAYERS >>> MERGE >>> MERGE VISIBLE
Save as a ,psp file
Open and highlight RASTER 1
Flood fill with WHITE
Open the "DaisyWeb_RomanticEvening" tube
Right click on the Title Bar and select COPY from the options
Go to your frame image ...
Right click on the Title Bar
and select PASTE AS NEW SELECTION from the options.
IMAGE >>> RESIZE = 75%
Ensure "Resize all layers" is UNCHECKED
Reposition and DESELECT

Activate the MERGED layer
With your MAGIC WAND ...
Same settings
Select the CENTRE of the image
LAYERS >>> NEW RASTER LAYER
LAYERS >>> ARRANGE >>> MOVE DOWN
SELECTIONS >>> MODIFY >>> EXPAND = 2
SELECTIONS >>> INVERT
EFFECTS >>> PLUGINS >>> EYE CANDY 3 >>> DROP SHADOW
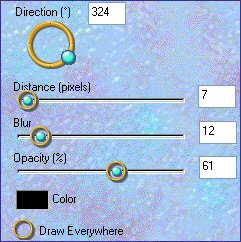
DESELECT
LAYERS >>> MERGE >>> MERGE ALL (Flatten)
Save as a .jpg file
Page designed by

for

http://www.artistrypsp.com/
Copyright ©
2000-2007 Artistry In PSP / PSP Artistry
All rights reserved.
Unless specifically made available for
download,
no graphics or text may be removed from
this site for any reason
without written permission from Artistry
In PSP / PSP Artistry
|