MASK 1 - 2007 -
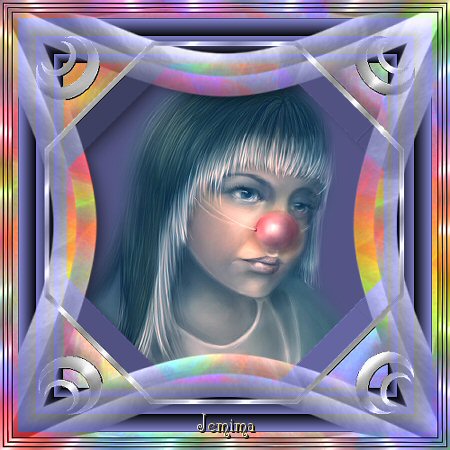
FANTASY FRAME
PSP8/9/X
This tutorial was
written by Jemima ~ September 2006
Copyright © 2006/7 ~ Jemima
~ All rights reserved
********************************
You will need the
following to complete this tutorial
Materials
Click link... then....
Right click and Save Image As to a folder on your computer
Save both
"Saphiere_GraphicDream_Tubes_Maske_143"
and
"09_00_00_gaylord-john_WaterDroplets"
If you wish to use the 'Clown' you can download it HERE
Extract to a folder on your computer
~*~*~*~*~*~*~*~*~*~*~*~
Plugins
** EYE CANDY3 **
http://www.pircnet.com/downloads.html
********************************
SAVE OFTEN .. you never know when PSP will 'hiccup'!
In your MATERIALS PALETTE .... Set your Background to SOLID WHITE
Open up the "09_00_00_gaylord-john_WaterDroplets" in your PSP workspace
and Minimize
Open up the "Saphiere_GraphicDream_Tubes_Maske_143" in yout PSP workspace
WINDOW >>> DUPLICATE
Close the original Image
LAYERS >>> Promote background Layer
With your MAGIC WAND
PSP9/X USERS: CHECK CONTIGUOUS

Select the INNER & OUTER white areas, using your SHIFT key
Flood Fill with WHITE
DESELECT
On your MATERIALS PALETTE
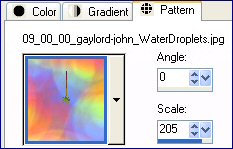
Change your Background to PATTERN and locate the
"09_00_00_gaylord-john_WaterDroplets"
Use these settings
With your MAGIC WAND ...
Same settings
Select the OUTER WHITE area
Flood Fill with Background Pattern

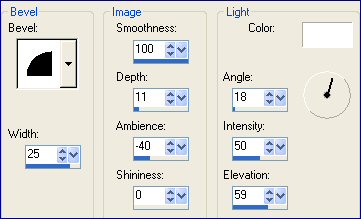
EFFECTS >>> 3D EFFECTS >>> INNER BEVEL
DESELECT
With your MAGIC WAND
Same settings
Select one of the BLACK areas
SELECTIONS >>> MODIFY >>> SELECT SIMILAR

LAYERS >>> NEW RASTER LAYER
Load the GOLDFILL pattern into your Foreground
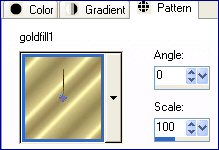
Flood Fill with GOLD Pattern
SELECTIONS >>> MODIFY >>> CONTRACT = 1
SELECTIONS >>> INVERT
EDIT >>> CLEAR
SELECTIONS >>> INVERT
EFFECTS >>> 3D EFFECTS >>> INNER BEVEL
Same settings
REPEAT Inner Bevel
DESELECT

With your MAGIC WAND
Same settings
Select the INNER white area
Highlight Raster 1 to activate
EDIT >>> CLEAR
DESELECT
EFFECTS >>> 3D EFFECTS >>> CHISEL
COLOUR =
#8E90E4

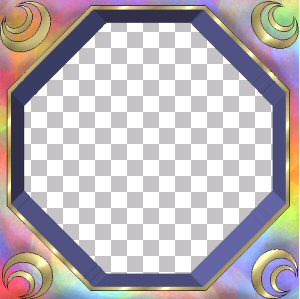
IMAGE >>> RESIZE = 85%
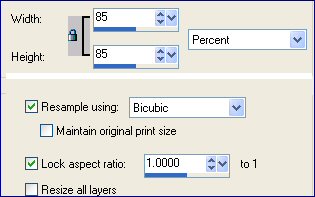
Highligh Raster 2 to activate
REPEAT Resize .... Close Raster 2 .... Highlight Raster 1
With your MAGIC WAND
Same settings
Select the OUTER transparent area
LAYERS >>> NEW RASTER LAYER
EFFECTS >>> 3D EFFECTS >>> CHISEL
Same settings
DESELECT
With your MAGIC WAND
Same settings
Select the INNER transparent area
EFFECTS >>> 3D EFFECTS >>> CHISEL
Change SIZE to 10
DESELECT
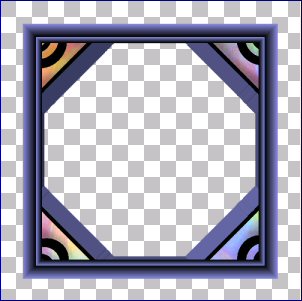
With your MAGIC WAND
Same settings
Select the OUTER transparent area
Flood Fill with Background Pattern
EFFECTS >>> 3D EFFECTS >>> INNER BEVEL
Same settings
DESELECT
SELECTIONS >>> SELECT ALL
SELECTIONS >>> MODIFY >>> CONTRACT = 20
SELECTIONS >>> INVERT
EFFECTS >>> 3D EFFECTS >>> CHISEL
Change SIZE to 20
EFFECTS >>> 3D Effects >>> Drop Shadow
Vertical & Horizontal offsets = 1
Colour = Black
Opacity = 50
Blur = 0
Repeat Drop Shadow effect changing
Vertical & Horizontal Offsets to - ( minus ) 1
Click OK
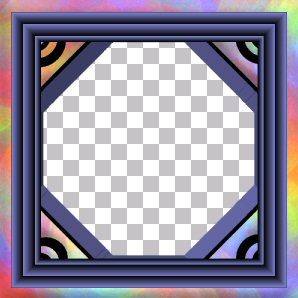
LAYERS >>> DUPLICATE
EDIT >>> CLEAR
DESELECT
EFFECTS >>> DISTORTION EFFECTS >>> LENS DISTORTION
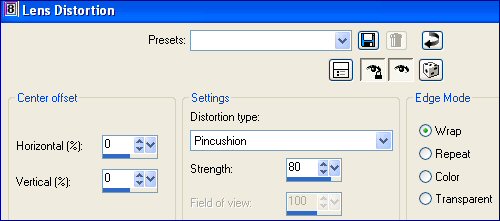
Change BLEND MODE on Copy of Raster 3 to LUMINANCE (Legacy)
EFFECTS >>> 3D EFFECTS >>> INNER BEVEL
Same settings
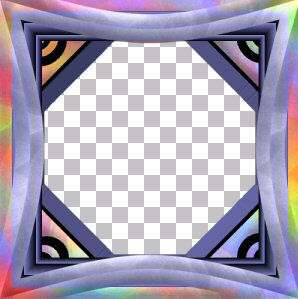
IMAGE >>> RESIZE = 95%
Ensure "Resize all layers" is UNCHECKED
EFFECTS >>> DISTORTION EFFECTS >>> LENS DISTORTION
Change the SIZE to 40
Open and highlight Raster 2
Change BLEND MODE to LUMINANCE (Legacy)
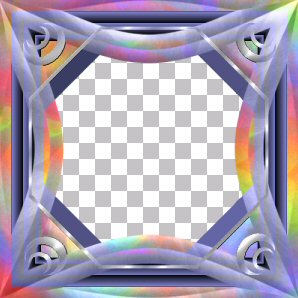
LAYERS >>> MERGE >>> MERGE VISIBLE
LAYERS >>> NEW RASTER LAYER
SELECTIONS >>> SELECT ALL
SELECTIONS >>> MODIFY >>> CONTRACT = 3
SELECTIONS >>> INVERT
Flood fill with GOLD
Change BLEND MODE to LUMINANCE (Legacy)
EFFECTS >>> 3D Effects >>> Drop Shadow
Vertical & Horizontal offsets = 1
Colour = Black
Opacity = 100
Blur = 0
Repeat Drop Shadow effect changing
Vertical & Horizontal Offsets to - ( minus ) 1
Click OK
DESELECT
LAYERS >>> DUPLICATE
IMAGE >>> RESIZE = 98%
Ensure "Resize all layers" is UNCHECKED
LAYERS >>> DUPLICATE
IMAGE >>> RESIZE = 98%
Ensure "Resize all layers" is UNCHECKED
LAYERS >>> MERGE >>> MERGE VISIBLE
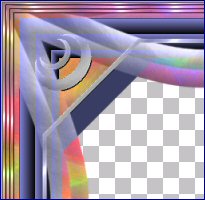
With your MAGIC WAND ...
Same settings
Select the INNER transparent area
LAYERS >>> NEW RASTER LAYER
LAYERS >>> ARRANGE >>> MOVE DOWN
SELECTIONS >>> MODIFY >>> EXPAND = 3
SELECTIONS >>> INVERT
EFFECTS >>> PLUGINS >>> EYE CANDY 3 >>> DROP SHADOW
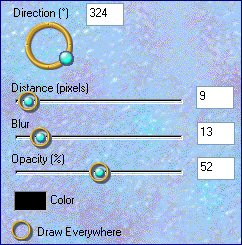
DESELECT
LAYERS >>> MERGE >>> MERGE VISIBLE
Save it as a .psp image
Your Fantasy frame is now ready or the image of your choice.
~*~*~*~*~*~*~*~*~*~*~*~*~
Page designed by

for

http://www.artistrypsp.com/
Copyright ©
2000-2007 Artistry In PSP / PSP Artistry
All rights reserved.
Unless specifically made available for
download,
no graphics or text may be removed from
this site for any reason
without written permission from Artistry
In PSP / PSP Artistry
|