Jade
PSP8/9
This tutorial was
written by Jemima ~ January 2007
Copyright © 2007 ~ Jemima
~ All rights reserved
********************************
You will need the
following to complete this tutorial
Materials
" Line art green.pspimage "
" Jade.pspimage "
Click link... then....
Right click and Save Image As to your PSP Patterns folder
" togetherness.psp "
" BabyTrain_10-04_IKN2.psp "
Click link... then....
Right click and Save Image As to a folder on your computer
Plugin
** EYE CANDY3 **
http://www.pircnet.com/downloads.html
********************************
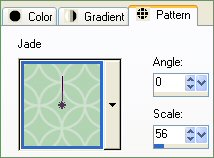
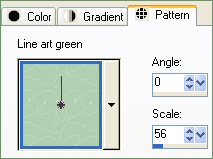
In your MATERIALS PALETTE load
" Jade " in the foreground and
" Line art green " in the background using these settings
 .. .. 
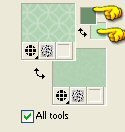
Load SOLID DARK GREEN ( #6D906D ) in the foreground
and SOLID LIGHT GREEN ( #C3E9C3 ) in the background
Open a new image 500 x 450
Transparent background
LAYERS >>> NEW RASTER LAYER
BORDER 1
Flood fill with the " Jade " pattern
EFFECTS >>> EDGE EFFECTS >>> ENHANCE
SELECTIONS >>> SELECT ALL
SELECTIONS >>> MODIFY >>> CONTRACT = 20
EDIT >>> CLEAR
DESELECT
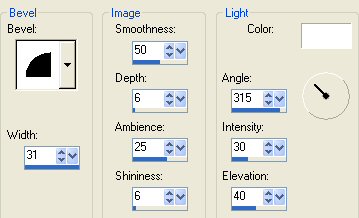
EFFECTS >>> 3D EFFECTS >>> INNER BEVEL
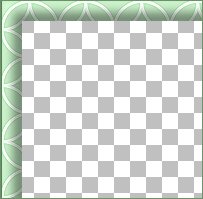
EFFECTS >>> 3D EFFECTS >>> DROP SHADOW
Vertical & Horizontal offsets = 1
Colour = GREEN ( #6D906D )
Opacity = 100
Blur = 0
Repeat Drop Shadow effect changing
Vertical & Horizontal Offsets to - ( minus ) 1
Click OK
BORDER 2
With your MAGIC WAND
Mode = Replace
Match Mode = RGB Value
Tolerance = 0
Feather = 0
Antialias = UNchecked
Sample Merged = UNCHECKED
PSP9 USERS: CHECK CONTIGUOUS
Select the CENTRE transparent area
LAYERS >>> NEW RASTER LAYER
In your MATERIALS PALETTE click on the GRADIENT symbol (foreground)
and load
"Foreground-background" gradient.
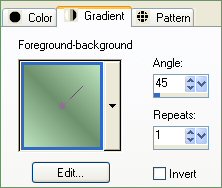
Flood fill with the "Foreground-background" gradient.
SELECTIONS >>> MODIFY >>> CONTRACT = 3
EDIT >>> CLEAR
DESELECT
EFFECTS >>> 3D EFFECTS >>> DROP SHADOW
Vertical & Horizontal offsets = 1
Colour = GREEN ( #6D906D )
Opacity = 100
Blur = 0
Repeat Drop Shadow effect changing
Vertical & Horizontal Offsets to - ( minus ) 1
Click OK
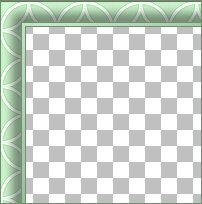
BORDER 3
With your MAGIC WAND
Select the CENTRE transparent area
LAYERS >>> NEW RASTER LAYER
Flood fill with the " Line art green " pattern
EFFECTS >>> EDGE EFFECTS >>> ENHANCE
SELECTIONS >>> MODIFY >>> CONTRACT = 25
EDIT >>> CLEAR
DESELECT
EFFECTS >>> 3D EFFECTS >>> INNER BEVEL
Same settings
EFFECTS >>> 3D EFFECTS >>> DROP SHADOW
Vertical & Horizontal offsets = 1
Colour = GREEN ( #6D906D )
Opacity = 100
Blur = 0
Repeat Drop Shadow effect changing
Vertical & Horizontal Offsets to - ( minus ) 1
Click OK
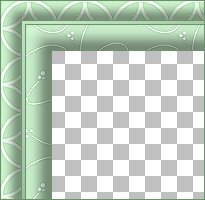
BORDER 4
With your MAGIC WAND
Select the CENTRE transparent area
LAYERS >>> NEW RASTER LAYER
In your MATERIALS PALETTE click on the GRADIENT and CHECK "INVERT"
Flood fill with the "Foreground-background" gradient.
SELECTIONS >>> MODIFY >>> CONTRACT = 3
EDIT >>> CLEAR
DESELECT
EFFECTS >>> 3D EFFECTS >>> DROP SHADOW
Vertical & Horizontal offsets = 1
Colour = GREEN ( #6D906D )
Opacity = 100
Blur = 0
Repeat Drop Shadow effect changing
Vertical & Horizontal Offsets to - ( minus ) 1
Click OK

BORDER 5
Activate Raster 2
LAYERS >>> DUPLICATE
IMAGE >>> RESIZE =70%
Ensure "Resize all layers" is UNCHECKED
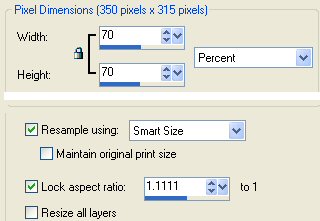

CLOSE Raster 1
LAYERS >>> MERGE >>> MERGE VISIBLE
BORDER 6
With your MAGIC WAND
Select the transparent area between the borders
LAYERS >>> NEW RASTER LAYER
Flood fill with SOLID LIGHT GREEN ( #C3E9C3 )
EFFECTS >>> 3D EFFECTS >>> INNER BEVEL
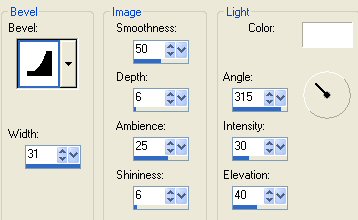
EFFECTS >>> 3D EFFECTS >>> DROP SHADOW
Vertical & Horizontal offsets = 1
Colour = GREEN ( #6D906D )
Opacity = 100
Blur = 0
Repeat Drop Shadow effect changing
Vertical & Horizontal Offsets to - ( minus ) 1
Click OK
DESELECT
LAYERS >>> MERGE >>> MERGE VISIBLE

BORDER 7
With your MAGIC WAND
Select the CENTRE transparent area
Flood fill with SOLID DARK GREEN ( #6D906D )
SELECTIONS >>> MODIFY >>> CONTRACT = 3
EDIT >>> CLEAR
SELECTIONS >>> MODIFY >>> EXPAND = 2
SELECTIONS >>> INVERT
LAYERS >>> NEW RASTER LAYER
LAYERS >>> ARRANGE >>> MOVE DOWN
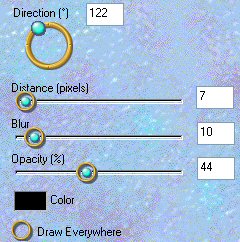
EFFECTS >>> PLUGINS >>> EYE CANDY 3 >>> DROP SHADOW

DESELECT
Save as a .psp image
Activate the MERGED layer
With your MAGIC WAND
Select the CENTRE transparent area
LAYERS >>> NEW RASTER LAYER
LAYERS >>> ARRANGE >>> MOVE DOWN (Twice)
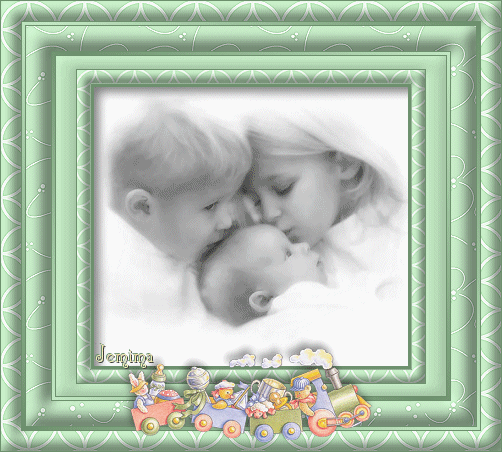
Open up the " togetherness.psp " tube
Right click on the Title Bar and select COPY from the options
Go to your frame image
Right click on the Title Bar
and select PASTE AS NEW SELECTION from the options.
IMAGE >>> RESIZE = 65%
Ensure "Resize all layers" is UNCHECKED
Reposition with your MOVER tool in the centre of the frame
DESELECT
Change the BLEND Mode to MULTIPLY
LAYERS >>> DUPLICATE
Reduce OPACITY to 50%
ADJUST >>> SHARPNESS >>> SHARPEN
OPEN & Activate Raster 1
Flood fill with WHITE
LAYERS >>> MERGE >>> MERGE VISIBLE
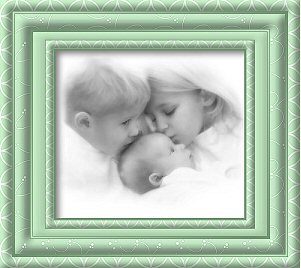
LAYERS >>> NEW RASTER LAYER
Open up the " BabyTrain_10-04_IKN2.psp " tube
Right click on the Title Bar and select COPY from the options
Go to your frame image
Right click on the Title Bar
and select PASTE AS NEW SELECTION from the options
IMAGE >>> RESIZE = 65%
Ensure "Resize all layers" is UNCHECKED
Reposition with your MOVER tool in the centre bottom of the frame
DESELECT
ADJUST >>> SHARPNESS >>> SHARPEN
LAYERS >>> DUPLICATE
EFFECTS >>> PLUGINS >>> EYE CANDY 3 >>> DROP SHADOW
LAYERS >>> MERGE >>> MERGE VISIBLE

Save as a .jpg image
Page designed by

for

http://www.artistrypsp.com/
Copyright ©
2000-2007 Artistry In PSP / PSP Artistry
All rights reserved.
Unless specifically made available for
download,
no graphics or text may be removed from
this site for any reason
without written permission from Artistry
In PSP / PSP Artistry
|