FASHION
PSP8/9
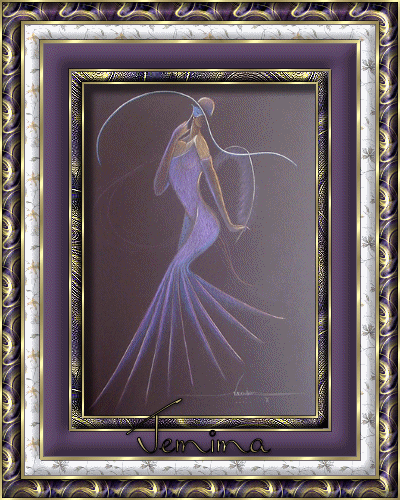
This tutorial was
written by Jemima ~ January 2007
Copyright © 2007 ~ Jemima
~ All rights reserved
This tut has been successfully tested in PSP8, PSP9, PSPX and PSPXI
********************************
You will need the
following to complete this tutorial
Materials
'goldfill1' pattern'
'NikSeamless' pattern
'ivy_mutedfloral2' pattern
Click link... then....
Right click and Save Image As to a folder on your computer
'P1010010_EDIT10_0020' (fashion image)
Click link... then....
Right click and Save Image As to a folder on your computer
********************************
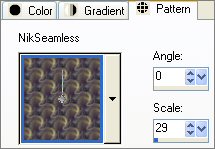
In your MATERIALS PALETTE load the 'goldfill1' pattern in your foreground
and the 'NikSeamless' pattern in your background
using these settings
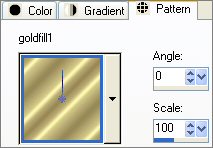 .. .. 
Open a new image 400 x 500
Transparent background
Flood fill with 'NikSeamless' pattern
SELECTIONS >>> SELECT ALL
SELECTIONS >>> MODIFY >>> CONTRACT = 20
EDIT >>> CLEAR
SELECTIONS >>> INVERT
EFFECTS >>> 3D EFFECTS >>> INNER BEVEL
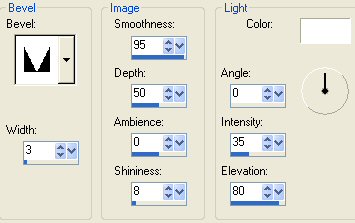
SELECTIONS >>> INVERT
LAYERS >>> NEW RASTER LAYER
Flood fill with 'goldfill1' pattern
SELECTIONS >>> MODIFY >>> CONTRACT = 3
EDIT >>> CLEAR
DESELECT
EFFECTS >>> 3D Effects >>> Drop Shadow
Vertical & Horizontal offsets = 1
Colour = Black
Opacity = 55
Blur = 0
Repeat Drop Shadow effect changing
Vertical & Horizontal Offsets to - ( minus ) 1
Click OK
LAYERS >>> MERGE >>> MERGE VISIBLE
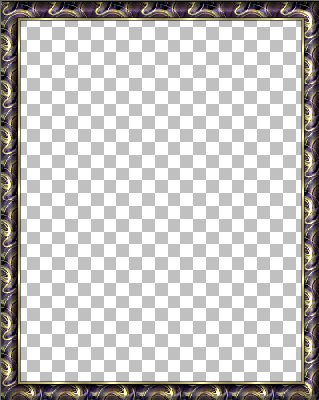
With your MAGIC WAND
Mode = Replace
Match Mode = RGB Value
Tolerance = 0
Feather = 0
Antialias = UNchecked
Sample Merged = UNCHECKED
PSP9 USERS: CHECK CONTIGUOUS
Select the CENTRE transparent area
In your MATERIALS PALETTE load the 'ivy_mutedfloral2' pattern
in your background using these settings
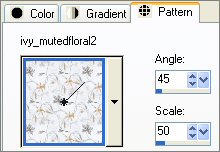
LAYERS >>> NEW RASTER LAYER
Flood fill with 'ivy_mutedfloral2' pattern
SELECTIONS >>> MODIFY >>> CONTRACT = 15
EDIT >>> CLEAR
DESELECT
EFFECTS >>> 3D EFFECTS >>> INNER BEVEL
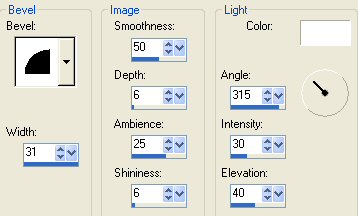
With your MAGIC WAND
Same settings
Select the CENTRE transparent area
LAYERS >>> NEW RASTER LAYER
Flood fill with 'goldfill1' pattern
SELECTIONS >>> MODIFY >>> CONTRACT = 3
EDIT >>> CLEAR
DESELECT
EFFECTS >>> 3D Effects >>> Drop Shadow
Vertical & Horizontal offsets = 1
Colour = Black
Opacity = 55
Blur = 0
Repeat Drop Shadow effect changing
Vertical & Horizontal Offsets to - ( minus ) 1
Click OK
Close the MERGED layer
LAYERS >>> MERGE >>> MERGE VISIBLE
Rename this layer 'Merged 2'
OPEN the MERGED layer
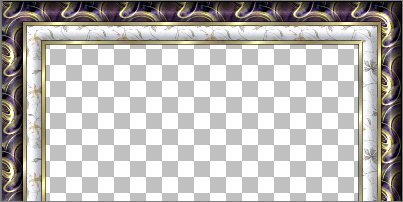
Still on the Merged 2 layer
With your MAGIC WAND
Same settings
Select the CENTRE transparent area
LAYERS >>> NEW RASTER LAYER
Flood fill with PURPLE ( #584363 )
SELECTIONS >>> MODIFY >>> CONTRACT = 25
EDIT >>> CLEAR
DESELECT
EFFECTS >>> 3D EFFECTS >>> INNER BEVEL
Same settings as last Inner Bevel
With your MAGIC WAND
Same settings
Select the CENTRE transparent area
LAYERS >>> NEW RASTER LAYER
Flood fill with 'goldfill1' pattern
SELECTIONS >>> MODIFY >>> CONTRACT = 2
EDIT >>> CLEAR
DESELECT
EFFECTS >>> 3D Effects >>> Drop Shadow
Vertical & Horizontal offsets = 1
Colour = Black
Opacity = 55
Blur = 0
Repeat Drop Shadow effect changing
Vertical & Horizontal Offsets to - ( minus ) 1
Click OK
Close the MERGED and Merged 2 layers
LAYERS >>> MERGE >>> MERGE VISIBLE
Rename this layer 'Merged 3'
OPEN the MERGED and Merged 2 layers
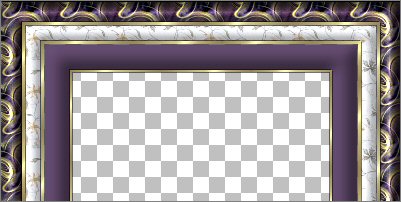
Still on the Merged 3 layer
With your MAGIC WAND
Same settings
Select the CENTRE transparent area
LAYERS >>> NEW RASTER LAYER
In your MATERIALS PALETTE load the 'NikSeamless' pattern
in your background using these settings
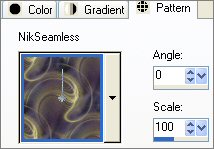
Flood fill with 'NikSeamless' pattern
ADJUST >>> SHARPNESS >>> SHARPEN MORE
SELECTIONS >>> MODIFY >>> CONTRACT = 10
EDIT >>> CLEAR
DESELECT
EFFECTS >>> 3D EFFECTS >>> INNER BEVEL
Same settings as before
EXCEPT
Change DEPTH = 30
ADJUST >>> SHARPNESS >>> SHARPEN
With your MAGIC WAND
Same settings
Select the CENTRE transparent area
LAYERS >>> NEW RASTER LAYER
Flood fill with 'goldfill1' pattern
SELECTIONS >>> MODIFY >>> CONTRACT = 2
EDIT >>> CLEAR
DESELECT
EFFECTS >>> 3D Effects >>> Drop Shadow
Vertical & Horizontal offsets = 1
Colour = Black
Opacity = 55
Blur = 0
Repeat Drop Shadow effect changing
Vertical & Horizontal Offsets to - ( minus ) 1
Click OK
LAYERS >>> MERGE >>> MERGE VISIBLE
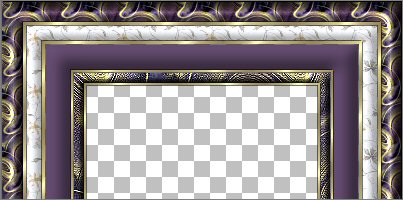
LAYERS >>> NEW RASTER LAYER
SELECTIONS >>> SELECT ALL
SELECTIONS >>> MODIFY >>> CONTRACT = 2
SELECTIONS >>> INVERT
Flood fill with 'goldfill1' pattern
EFFECTS >>> 3D Effects >>> Drop Shadow
Vertical & Horizontal offsets = 1
Colour = Black
Opacity = 55
Blur = 0
Repeat Drop Shadow effect changing
Vertical & Horizontal Offsets to - ( minus ) 1
Click OK
DESELECT
LAYERS >>> MERGE >>> MERGE VISIBLE
With your MAGIC WAND
Same settings
Select the CENTRE transparent area
LAYERS >>> NEW RASTER LAYER
SELECTION >>> INVERT
EFFECTS >>> 3D Effects >>> Drop Shadow
Vertical & Horizontal offsets = 8
Colour = Black
Opacity = 55
Blur = 8
DESELECT
LAYERS >>> ARRANGE >>> MOVE DOWN
LAYERS >>> MERGE >>> MERGE VISIBLE
(At this point you should save your frame as a .psp image if you wish to use it again.
If you do this, then WINDOW >>> DUPLICATE and continue with the rest of
the instructions on the duplicated image)
LAYERS >>> NEW RASTER LAYER
LAYERS >>> ARRANGE >>> SEND TO BOTTOM
Open up the 'P1010010_EDIT10_0020' (fashion image)
Right click on the Title Bar and select COPY from the options
Go to your frame image
Right click on the Title Bar
and select PASTE AS NEW SELECTION from the options.
Reducing the size of the image distorted the lines in the drawing so...
Select your DEFORMATION tool and bring the nodes in to the centre of the frame as shown.
(The image can be moved up and down by placing your cursor over the 'circle' in the centre)
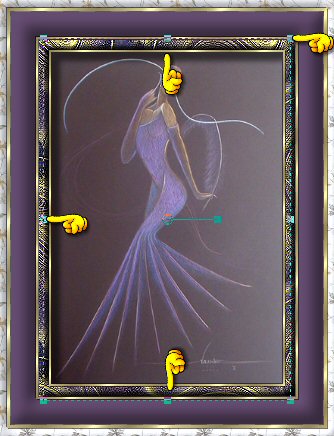
When you're happy with the placement add your watermark if you use one.
LAYERS >>> MERGE >>> MERGE ALL (Flatten)
Save as a .jpg image
TESTERS RESULTS
Page designed by

for

http://www.artistrypsp.com/
Copyright ©
2000-2007 Artistry In PSP / PSP Artistry
All rights reserved.
Unless specifically made available for
download,
no graphics or text may be removed from
this site for any reason
without written permission from Artistry
In PSP / PSP Artistry
|