
VECTORING IMAGES
AND TUBES
PSP7
We'll create a
Vector image and tube at the same time
in this tutorial
This
tutorial was written by Jemima ~ July
2005
Copyright © 2005 ~
Jemima ~ All rights reserved
********************************
This can be
adapted for PSP8 and PSP9
Click on the image below
of Marissa Hargitay
and save the larger image to a folder on
your computer

********************************
Open up the image in your PSP workspace
Go to LAYERS >>> Promote to
Layer
Go to LAYERS >>> NEW RASTER
LAYER
Flood fill with a solid colour
(I used LILAC #CDAFC1 )
Go to LAYERS >>> ARRANGE
>>> SEND TO BOTTOM
Go to your LAYER PALETTE
Click on Layer 1 to activate
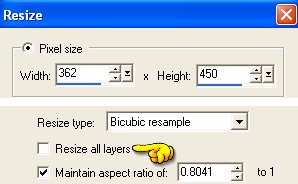
Go to IMAGE >>> RESIZE
Ensure "Resize All Layers" is
UNCHECKED

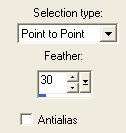
Click on your FREEHAND (Lasso) TOOL
SETTINGS
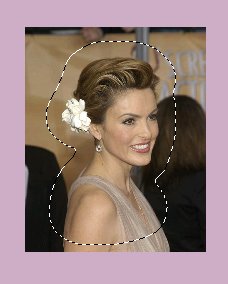
Work your way around the image as shown
below
No need to be too precise

When you join up with the beginning of
your section
Right click your mouse
Your image should look like this
Go to SELECTIONS >>> INVERT
Go to EDIT>>> CLEAR
DESELECT
Go to COLOURS >>> POSTERIZE
Set the LEVEL = 40
Click OK
Go to EFFECTS >>> NOISE
>>> EDGE PRESERVING SMOOTH
AMOUNT OF SMOOTHING = 16
The left side is BEFORE Posterize and
Edge Preserving Smooth
 
Pretty KEWL... Huh??!!
OK... now you can delete the bottom layer
Layer 2,
if you wish and save the image as a .psp
file
TIP:
When doing this with other images of your
own
play around with the POSTERIZE and EDGE
PRESERVING SMOOTH settings.
Every image will need different settings
to achieve
a good result.
You can also
create this effect on ready made tubes
*S*
Page designed by

for

http://www.artistrypsp.com/
Copyright
© 2000-2005 Artistry In PSP / PSP
Artistry
All rights reserved.
Unless specifically made available for
download,
no graphics or text may be removed from
this site for any reason
without written permission from Artistry
In PSP / PSP Artistry
TUTORIAL INDEX
|