BLUE WAVE
PSP8
Page 2
This
tutorial was written by Jemima ~ January
2005
Copyright © 2005 ~
Jemima ~ All rights reserved
********************************
Go to IMAGE >>> ADD BORDERS = 25
COLOUR = DARK BLUE
Go to SELECTIONS >>> SELECT ALL
Go to SELECTIONS >>> MODIFY
>>> CONTRACT = 35
Go to LAYERS >>> DUPLICATE
Go to EDIT >>> CLEAR
Go to SELECTIONS >>> INVERT
Go to EFFECTS >>> IMAGE EFFECTS
>>> PAGE CURL
Edge Mode >> Colour = #000080
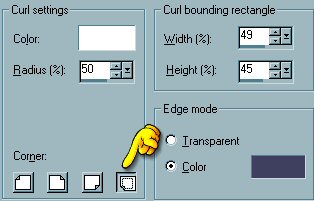
Go to EFFECTS >>> IMAGE EFFECTS
>>> PAGE CURL
Edge Mode >> Colour = #000080
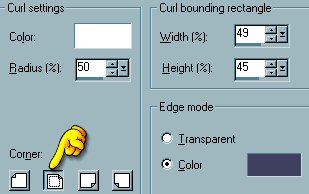
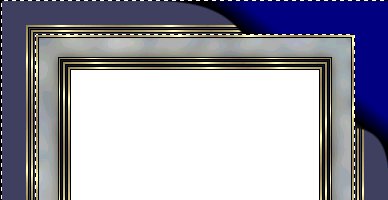
The top section of your frame
will look like this
The bottom section of your frame
will look like this

DESELECT
Go to EFFECTS >>> DISTORTION
EFFECTS >>> WAVE

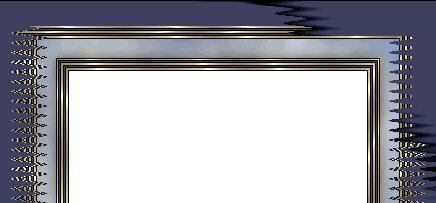
The bottom of you image should be
similar...
only in reverse.
Go to EFFECTS >>> 3D Effects
>>> Drop Shadow
Vertical offset = - minus) 1
Horizontal offset = 1
Colour = Black
Opacity = 100
Blur = 0
Click OK
Go to ADJUST >>> SHARPNESS
>>> SHARPEN
Go to LAYERS >>> MERGE
>>> MERGE ALL (Flatten)
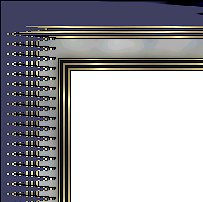
Go to IMAGE >>> ADD BORDERS = 3
COLOUR = WHITE
With your MAGIC WAND
Same settings
select the WHITE border
Flood fill with the 'goldfoil' pattern
Go to EFFECTS >>> 3D Effects
>>> Drop Shadow
Vertical & Horizontal offsets
= 1
Colour = Black
Opacity = 100
Blur = 0
Repeat Drop
Shadow effect changing
Vertical & Horizontal Offsets to - (
minus ) 1
Click OK
DESELECT
******
Go to IMAGE
>>> ADD BORDERS = 3
COLOUR = DARK BLUE
With your MAGIC WAND
Same settings
select the BLUE border
Go to EFFECTS >>> 3D Effects
>>> Drop Shadow
Vertical & Horizontal offsets = 1
Colour = Black
Opacity = 100
Blur = 0
Repeat Drop
Shadow effect changing
Vertical & Horizontal Offsets to - (
minus ) 1
Click OK
DESELECT
******
Go to IMAGE >>> ADD BORDERS = 2
COLOUR = WHITE
With your MAGIC WAND
Same settings
select the WHITE border
Flood fill with the 'goldfoil' pattern
Go to EFFECTS >>> 3D Effects
>>> Drop Shadow
Vertical & Horizontal offsets = 1
Colour = Black
Opacity = 100
Blur = 0
Repeat Drop
Shadow effect changing
Vertical & Horizontal Offsets to - (
minus ) 1
Click OK
DESELECT
******
Go to IMAGE
>>> ADD BORDERS = 2
With your MAGIC WAND
Same settings
select the WHITE border
Flood fill with the 'goldfoil' pattern
Go to EFFECTS >>> 3D Effects
>>> Drop Shadow
Vertical & Horizontal offsets = 1
Colour = Black
Opacity = 100
Blur = 0
Repeat Drop
Shadow effect changing
Vertical & Horizontal Offsets to - (
minus ) 1
Click OK
DESELECT
Go to LAYERS >>> PROMOTE
BACKGROUND LAYER
With your MAGIC WAND
Same settings
Select the white centre of your image.
Go to EDIT >>> CLEAR
You may now resize your frame.
Save as a .psp image
C'est fini!!!!
*******************
To add an image
under your frame
With your MAGIC WAND
Match Mode = RGB Value
Tolerance = 0
Feather = 0
Sample Merged = UNCHECKED
Select the transparent centre of your
frame
Go to SELECTIONS >>> MODIFY
>>> EXPAND 3
Go to LAYERS >>> NEW RASTER
LAYER
Go to LAYERS >>>ARRANGE
>>> SEND TO BOTTOM
Right click on the title bar of the image
you wish to use
select COPY from the options
Right click on the title bar of the FRAME
image
select PASTE INTO SELECTION from the
options
Go to your LAYER PALETTE
Click on Layer 1 to activate
Go to SELECTIONS >>> MODIFY
>>> CONTRACT 3
Go to SELECTIONS >>> INVERT
Add a drop shadow
DESELECT
Go to LAYERS >>> MERGE
>>> MERGE ALL (Flatten)
AND YOU'RE DONE *S*
I would like to
thank CINDY & JOYCEY
from GRAFIXADDIX / AIPSP
for their assistance in testing this
tutorial *S*
Check out
their results on the following page.
NEXT
Page designed by

for

http://www.artistrypsp.com/
Copyright
© 2000-2005 Artistry In PSP / PSP
Artistry
All rights reserved.
Unless specifically made available for
download,
no graphics or text may be removed from
this site for any reason
without written permission from Artistry
In PSP / PSP Artistry
TUTORIAL INDEX
|